settings_input_componentIntegrations

Integrations that end with an invoice — not a closed ticket.

The only tool where integrations close the whole cycle: task → commit → merge → work report → invoice. No manual retyping, no middleware.

MCP server for AI assistants · inbound webhooks from GitHub and GitLab · import from Jira and Trello · export to Czech invoicing.

Run your project from chat — no terminal, no new UI

Paste one URL into Claude Cowork or claude.ai and you can plan, log time, and reply to clients straight from the conversation. OAuth 2.0 — no token, no config file.

link

Remote MCP server URL

https://mcptask.online/mcp/sse

Paste this URL into Customize → Connectors → Add custom connector in Cowork / claude.ai

Using Claude Cowork or claude.ai? Connect in 2 minutes with one URL — no terminal, no new dashboard.

  1. 1

    Create an account

    30-day free trial, no card.

  2. 2

    Paste the URL

    One URL, no token, no Client ID.

  3. 3

    Approve and chat

    OAuth in your browser, then chat.

menu_bookDetailed steps
expand_more
groups

On a Team or Enterprise plan?

An Owner first adds the connector in Organization settings → Connectors (https://claude.ai/admin-settings/connectors): Add → hover Custom → Web → paste the URL → Add. Each member then connects it themselves in Customize → Connectors — it carries a Custom label.

cloud

Heads up on architecture

The connection originates from Anthropic's cloud infrastructure, not from your machine. That is also true for Cowork and Claude Desktop. mcptask.online is publicly reachable, so no firewall or VPN setup is required.

  1. Create your mcptask.online account

    Free 30-day trial, no card. You can do this right now in a different tab.

  2. Be logged in

    The OAuth approval happens in this browser, so the account you just created has to be the active session here.

  3. Open Customize → Connectors in Cowork / claude.ai

    In Cowork or claude.ai, go to https://claude.ai/customize/connectors. Click the + and choose Add custom connector.

  4. Paste the mcptask.online URL

    Paste this URL — no Client ID or Secret, no token. Dynamic client registration handles the rest.

    linkRemote MCP server URL
    https://mcptask.online/mcp/sse
  5. Click Connect and approve

    Click Connect. Your browser opens the mcptask.online OAuth approval page — log in (if you aren't already) and click Authorize. No token, no password is shared with Anthropic.

  6. Enable the connector in your chat

    In a new chat, click + (lower left), choose Connectors and toggle mcptask.online on. Try a first prompt:

    List my projects and my next task.

From commit to invoice — automatically

Competitors end when the PR closes the ticket. mcptask.online keeps going until the invoice is issued.

1

Commit with %

A commit message like https://mcptask.online/ACCOUNT/tasks/47 40% updates the piece automatically.

2

Piece advances

The linked task moves forward and the effort is logged — no one opens the board to drag cards.

3

PR / MR merged

Merge triggers approval and a completion note. The last effort is set to 100%.

4

Work report ready

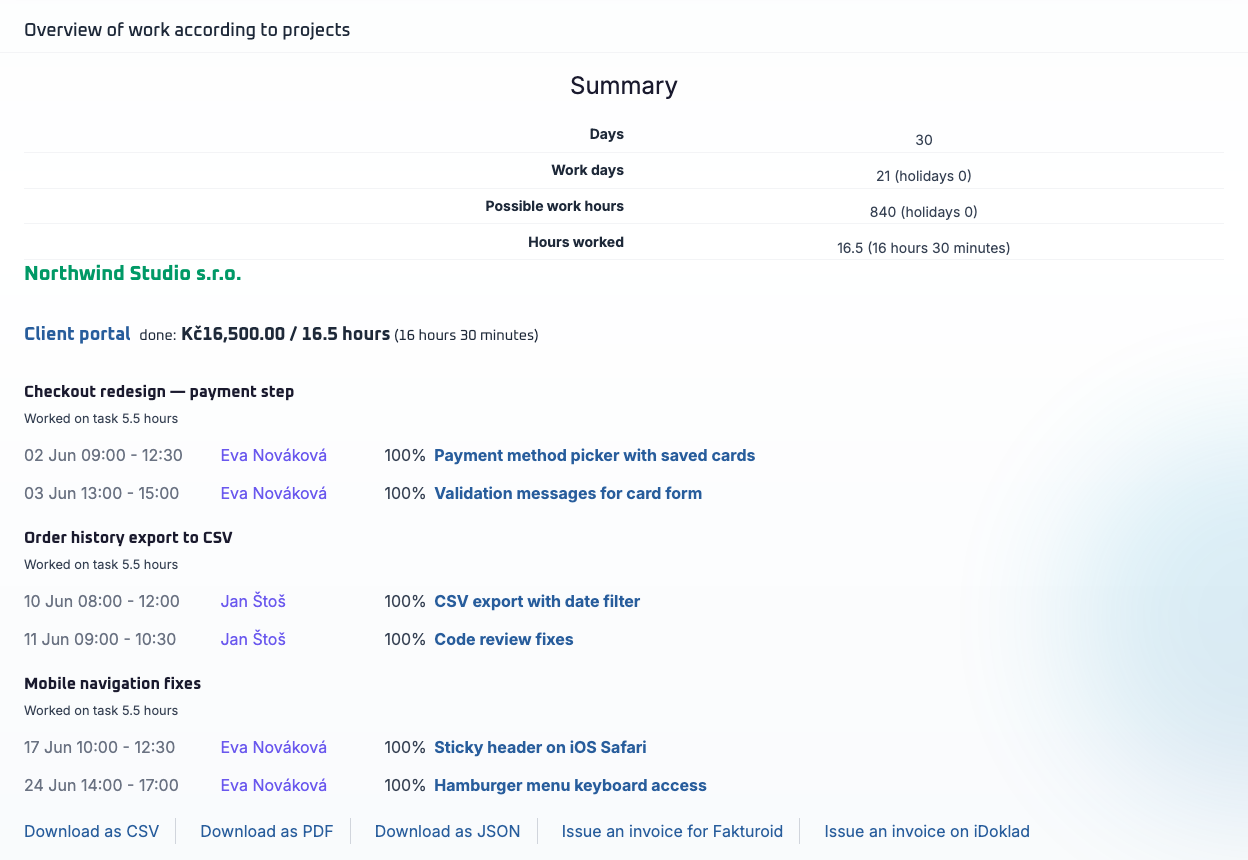
Reported time is collected into a clean work report for the period and client.

5

Invoice issued

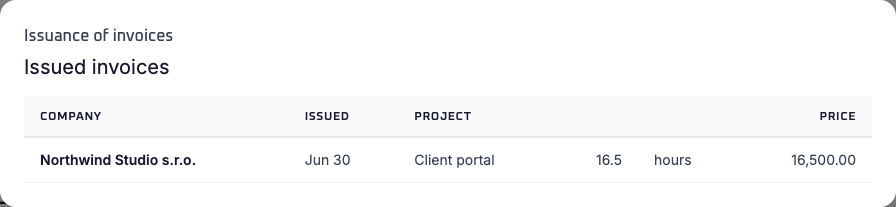
One click creates the invoice in Fakturoid or iDoklad, with VAT and client mapping handled.

auto_awesome

Others stop at 'ticket closed'. mcptask.online stops at 'invoice sent'.

Setup takes 5 minutes. No middleware, no scraping, no custom code.

Transition Without Risk

Coexist with the tools you already have. Sync both ways, then leave only when you want to.

Jira Integration

check_circleLiveverifiedAll Plans

Features

checkTwo-way sync: export tasks to Jira and import Jira issues back into mcptask.online
checkPer-project Jira connection (URL + project key + per-user API token)
checkPieces prefixed with the Jira issue key (e.g. PROJ-123) link both ways
checkComment, effort, and finish events on a piece are reflected on the linked Jira issue
checkWorks with Jira Cloud and self-hosted Jira (any version that supports basic auth + REST API)

How it works

  1. 1In mcptask.online, open Project → Settings → Integrations → Jira, and enter your Jira base URL and the target project key (e.g. PROJ).
  2. 2In your Jira user profile, create an API token and paste it into your mcptask.online user role (or override the username used to connect to Jira).
  3. 3On any task, pick "Export to Jira" — a Jira issue is created in the configured project and the issue key is prepended to the task name (PROJ-123 My task).
  4. 4On any Epic, Story, Task, or Recurent, pick "Import from Jira" — mcptask.online fetches the issue summary and creates a matching piece in the current project.
  5. 5Adding a comment, logging an effort, or finishing a piece pushes the update back to the linked Jira issue.

Configuration

arrow_forwardJira connection is configured per project (base URL + project key)
arrow_forwardJira credentials are stored per user role (API token, optional Jira username override)
arrow_forwardBoth directions are independent — you can export only, import only, or both
arrow_forwardTLS required; the same X-Hub-Signature-256-style trust model as GitHub/GitLab webhooks does NOT apply — Jira uses HTTP Basic auth with the API token

Trello Integration

check_circleLiveverifiedAll Plans

Features

checkExport: create a Trello card from any task — the task name gets a #SHORT_ID prefix and the card URL is posted as a message
checkImport: paste an existing card name; mcptask.online fetches its description and seeds the new task
checkTwo-way sync: once a task is linked to a card, comments, efforts, and finish events push to the Trello card as comments
checkPer-project connection — pick a single Trello board per project to write to
checkPer-user OAuth — each user authorises their own Trello account via the Trello API token

How it works

  1. 1Enable Trello in Project → Settings → Integrations and pick the target Trello board.
  2. 2Paste your Trello member token (API key + token) in Settings → Integrations on your user role.
  3. 3On any task, choose "Export to Trello" — a new card is created in the configured board and the task name is prefixed with the card's short ID.
  4. 4To import a card, type its name when creating a new task — the description is filled from the Trello card.
  5. 5After that, comments, logged efforts, and finishing the task all flow to the linked Trello card as comments automatically.

Configuration

arrow_forwardTrello connection is configured per project (board ID) and per user (member token)
arrow_forwardOnly the configured project's board is targeted — no scanning or bulk import across boards
arrow_forwardOutbound-only sync: events flow mcptask.online → Trello card, not the other way
arrow_forwardTLS required for the Trello API calls

EasyRedmine Integration

check_circleLiveverifiedAll Plans

Features

checkTwo-way sync: export tasks to EasyRedmine and import EasyRedmine issues back into mcptask.online
checkPer-project EasyRedmine connection (URL + project ID + per-user API key)
checkDifficulty custom field on the linked issue mirrors the piece's scrum point (e.g. M → 5h - M)
checkComments, effort progress, and finishing a piece push back to the linked issue as a note
checkEstimated hours on the issue average the piece's best and worst estimate
checkWorks with self-hosted EasyRedmine (any version with REST API + API key access)

How it works

  1. 1In mcptask.online, open Project → Settings → Integrations → EasyRedmine and enter your EasyRedmine base URL and the target project ID.
  2. 2In your EasyRedmine user profile, generate an API key and paste it into your user role on the project.
  3. 3Pick a custom field name on your EasyRedmine project that will carry the difficulty from mcptask.online (e.g. "Difficulty").
  4. 4On any task, pick "Export to EasyRedmine" — an issue is created and the piece name gets a #ID - prefix so the link goes both ways.
  5. 5On any Epic, Story, Task, or Recurent, start the name with #ID - when creating it — mcptask.online fetches the issue summary and seeds the piece description.
  6. 6After that, comments, logged efforts, and finishing the piece flow to the linked issue as notes automatically.

Configuration

arrow_forwardEasyRedmine connection is configured per project (base URL + project ID + difficulty custom field name)
arrow_forwardAPI key is stored per user role — each user keeps their own EasyRedmine credentials
arrow_forwardBoth directions are independent — you can export only, import only, or both
arrow_forwardImport works for any piece type (Epic, Story, Task, Recurent) — not just tasks
arrow_forwardLong issue descriptions are truncated on import with a warning pointing to the original issue

Invoicing & Billing

Fakturoid (Czech Republic)

check_circleLiveverifiedAll Plans

Features

checkOAuth 2.0 authentication
checkIssue invoice from work report
checkAutomatic VAT calculation (CZ rates)
checkClient mapping (Fakturoid contact ↔ mcptask.online company)
checkSet taxable supply and invoice date based on reported time

Workflow

  1. 1Reports → Work report
  2. 2Select company, period from the 1st to the end of the month
  3. 3Click "Issue invoice to Fakturoid"
  4. 4Invoice is created in Fakturoid
scheduleSetup Time: 5 minutes

iDoklad (Czech Republic)

check_circleLiveverifiedAll Plans

Features

checkOAuth 2.0 authentication
checkIssue invoice from work report
checkAutomatic VAT calculation (CZ rates)
checkClient mapping (iDoklad contact ↔ mcptask.online company)
checkSet taxable supply and invoice date based on reported time

Workflow

  1. 1Reports → Work report
  2. 2Select company, period from the 1st to the end of the month
  3. 3Click "Issue invoice on iDoklad"
  4. 4Invoice is created in iDoklad
scheduleSetup Time: 5 minutes

Stripe (mcptask.online's Own Billing)

check_circleLivecredit_cardAll Plans
info

Heads-up: Stripe here powers mcptask.online's own subscription billing (per-seat Starter/Professional/Enterprise). It is NOT a way to bill your clients through mcptask.online. For client billing, use Fakturoid or iDoklad above.

What Stripe does here

checkCharges your card for the mcptask.online plan you chose
checkPer-seat subscription, prorated on add/remove
checkFailed payment handling (we email + retry, then downgrade)
checkInvoice PDFs from Stripe for your accounting
checkMulti-currency for international cards

This is for…

arrow_forwardPaying mcptask.online for your team's seats
arrow_forwardGetting a clean Stripe-issued invoice for your expense report
arrow_forwardUpgrading/downgrading plans without contacting us

A PM Tool the Agent Drives

mcptask.online is built MCP-first. The agent doesn't just read your tasks — it uses the workspace as its work queue: get_next_task → work → log_work_progress → add_message.

What an autonomous workflow looks like

Plug in an MCP client and the workspace becomes the agent's to-do list, progress log, and hand-off channel.

check_circleWorkspace = the agent's work queue (MCP-first PM tool).
check_circleEvery action is scoped to the user's permissions and logged under their name.

You queue it at night, it's merged by morning — on your machine, with any model

mcptask_runner is an autonomous developer that runs on your own infrastructure and uses this MCP server as its work queue. No lock-in to a single model or a cloud sandbox.

open_in_newSee how the runner works
check_circleUse any model, even a cheap or local one — you are not locked into a premium model.
check_circleRuns against your real environment — real database, real system tests, real screenshots.
check_circleHits an unrelated bug mid-task? It opens its own tracked bug piece, fixes it, merges, and resumes.

What is MCP?

MCP (Model Context Protocol) is the standard protocol AI assistants like Claude use to call external tools and read external data. Instead of parsing HTML or hand-rolling HTTP, the AI speaks MCP natively and we serve the tool definitions.

check_circleAI understands data structure immediately
check_circleNo custom integration code needed
check_circleReliable, versioned protocol
check_circleSame interface for all MCP clients

What you can do over MCP

Read:

  • visibilityList projects and pieces (tasks/stories/epics)
  • visibilityGet piece details (description, status, history)
  • visibilityView parent/child relationships
  • visibilityAccess comments and attachments
  • visibilityView work performed

Write:

  • editUpdate piece status
  • editLog work efforts
  • editAdd comments
  • editAttach files
  • editCreate pieces and subtasks

Query:

  • searchGet next available piece (priority-sorted)
  • searchFilter pieces by project, status, type
  • searchSearch piece descriptions
  • searchList recent activity

For Developers

No middleware, no scraping, no fictional endpoints. Set up in 5 minutes and drive mcptask.online from your AI client, Git host, or server script.

  • account_circleClaude Cowork / claude.ai — detailed OAuth walkthrough

    Full click-by-click walkthrough. If you only need the headline, the main section above has it.

    1. Create your mcptask.online account

      Free 30-day trial, no card. You can do this right now in a different tab.

    2. Be logged in

      The OAuth approval happens in this browser, so the account you just created has to be the active session here.

    3. Open Customize → Connectors in Cowork / claude.ai

      In Cowork or claude.ai, go to https://claude.ai/customize/connectors. Click the + and choose Add custom connector.

    4. Paste the mcptask.online URL

      Paste this URL — no Client ID or Secret, no token. Dynamic client registration handles the rest.

      linkRemote MCP server URL
      https://mcptask.online/mcp/sse
    5. Click Connect and approve

      Click Connect. Your browser opens the mcptask.online OAuth approval page — log in (if you aren't already) and click Authorize. No token, no password is shared with Anthropic.

    6. Enable the connector in your chat

      In a new chat, click + (lower left), choose Connectors and toggle mcptask.online on. Try a first prompt:

      List my projects and my next task.

    groups

    On a Team or Enterprise plan?

    An Owner first adds the connector in Organization settings → Connectors (https://claude.ai/admin-settings/connectors): Add → hover Custom → Web → paste the URL → Add. Each member then connects it themselves in Customize → Connectors — it carries a Custom label.

    cloud

    Heads up on architecture

    The connection originates from Anthropic's cloud infrastructure, not from your machine. That is also true for Cowork and Claude Desktop. mcptask.online is publicly reachable, so no firewall or VPN setup is required.

  • codeConnect from Claude Code / Cursor / Cline — .mcp.json

    Use this if you prefer to drive mcptask.online from a terminal-based AI client. After this, every MCP client you connect (Claude Code, Cursor, Cline, …) can talk to mcptask.online.

    1. 1. Get your MCPTASK_TOKEN

      Log in to mcptask.online → View user → Advanced info → API Token. Copy the long string.

    2. 2. Export it in your shell

      Paste this in your terminal (or add to ~/.zshrc / ~/.bashrc so it persists):

       export MCPTASK_TOKEN=xxxxxxxxxxxxxxxxxxxxxxxxxxxx 
    3. 3. Drop this in your client's .mcp.json

      code.mcp.json
      {  "mcpServers": {    "mcptask-online": {      "type": "sse",      "url": "https://mcptask.online/mcp/sse",      "headers": { "Authorization": "Bearer ${MCPTASK_TOKEN}" }    }  }}
    4. 4. Where does the file live?

      Claude Code reads .mcp.json from your project root (or ~/.claude.json globally). For Claude Desktop / Cursor / Cline, paste the same JSON into the client's MCP config dialog.

    5. 5. Restart your AI client

      Claude Code, Cursor, etc. pick up MCP servers on restart. You'll see the mcptask-online server listed in available tools.

    info

    Other MCP clients

    Standard MCP over SSE. Use the same URL (https://mcptask.online/mcp/sse) and the same Authorization: Bearer header as above.

  • codeGitHub webhooks — push + pull request

    GitHub Integration

    check_circleLive (Inbound Webhooks)schedule5 minutes

    Features

    codeTwo repository webhooks — one for push events, one for pull request events
    codeCommit messages link work to a piece and set its progress percentage
    codePull request body references link the PR and approve the piece on merge
    codeSigned with your account secret token via X-Hub-Signature-256

    How it works

    1. 1Copy your account secret token from mcptask.online (Account → Integrations).
    2. 2In your GitHub repository, add a webhook with Payload URL https://mcptask.online/github/efforts, select Just the push event, and paste the secret token.
    3. 3Add a second webhook with Payload URL https://mcptask.online/github/pulls, select Let me select individual events → Pull requests, and paste the same secret token.
    4. 4In commit messages, add a line https://mcptask.online/ACCOUNT/tasks/ID NN% where NN is the progress percentage.
    5. 5In pull request descriptions, add a line mcptask: https://mcptask.online/ACCOUNT/tasks/ID.
    6. 6When the PR is merged, the referenced piece is approved and the last effort is set to 100%.

    How to reference a piece

    Use the piece's public URL https://mcptask.online/ACCOUNT/tasks/ID. ACCOUNT is your account code and ID is the piece's relative ID shown on the piece page and in the URL.

    Examples:

     https://mcptask.online/ACCOUNT/tasks/47 40%https://mcptask.online/ACCOUNT/tasks/48 100%mcptask: https://mcptask.online/ACCOUNT/tasks/47 

    Pull Request Integration

    • mergePR opened → a note with the PR link is added to the piece
    • mergePR merged → the piece is approved and a completion note is added
    • mergeThe last effort's progress is set to 100% on merge
    • mergeWorks with any public or private repository that can reach mcptask.online

    Configuration

    settingsTwo webhooks per repository (separate endpoints for push and pull request events)
    settingsPrivate repository support
    settingsNo source code access — only webhook metadata is processed
    settingsTLS required
  • codeGitLab webhooks — push + merge request

    GitLab Integration

    check_circleLive (Inbound Webhooks)schedule5 minutes

    Features

    codeTwo project webhooks — one for push events, one for merge request events
    codeCommit messages link work to a piece and set its progress percentage
    codeMerge request description references link the MR and approve the piece on merge
    codeAuthenticated by the X-Gitlab-Token header (your account's secret token)

    How it works

    1. 1Copy your account secret token from mcptask.online (Account → Integrations).
    2. 2In your GitLab project, add a webhook with URL https://mcptask.online/gitlab/efforts, trigger Push events, and paste the secret token into the Secret token field.
    3. 3Add a second webhook with URL https://mcptask.online/gitlab/merge_requests, trigger Merge request events, and use the same secret token.
    4. 4In commit messages, add a line https://mcptask.online/ACCOUNT/tasks/ID NN% where NN is the progress percentage.
    5. 5In merge request descriptions, add a line mcptask: https://mcptask.online/ACCOUNT/tasks/ID.
    6. 6When the MR is merged, the referenced piece is approved and the last effort is set to 100%.

    How to reference a piece

    Use the piece's public URL https://mcptask.online/ACCOUNT/tasks/ID. ACCOUNT is your account code and ID is the piece's relative ID shown on the piece page and in the URL.

    Examples:

     https://mcptask.online/ACCOUNT/tasks/47 40%https://mcptask.online/ACCOUNT/tasks/48 100%mcptask: https://mcptask.online/ACCOUNT/tasks/47 

    Merge Request Integration

    • mergeMR opened → a note with the MR link is added to the piece
    • mergeMR merged → the piece is approved and a completion note is added
    • mergeThe last effort's progress is set to 100% on merge
    • mergeWorks with GitLab.com and self-hosted GitLab (12.0+) that can reach mcptask.online

    Configuration

    settingsTwo webhooks per project (separate endpoints for push and merge request events)
    settingsSelf-hosted GitLab support (12.0+)
    settingsNo source code access — only webhook metadata is processed
    settingsTLS required
  • terminalREST API — JSON over HTTP

    REST API

    check_circleLive (Stable)workspace_premiumProfessional, Enterprise

    JSON over HTTP, scoped to your account. Use it when MCP isn't a fit (server-to-server scripts, dashboards, non-MCP tools).

    Authentication

    One credential, one header. The same MCPTASK_TOKEN you use for the MCP server authenticates every REST API call as a Bearer token.

    codeHeader
    Authorization: Bearer <MCPTASK_TOKEN>

    Get a token in mcptask.online → View user → Advanced info → API Token. JWT-encoded, signed with HS256, scoped to your user — no separate API key, no per-account rotation.

    Endpoints

    All endpoints are scoped to your account code (the short code from your mcptask.online URL). Real paths use /pieces (the generic term) rather than /tasks — we use "piece" as the umbrella word for task, story, epic, recurent.

    Projects
    codeGET /api/{account_code}/projects - List projects
    Pieces (Tasks, Stories, Epics, Recurents)
    codeGET /api/{account_code}/pieces/{id} - Get piece
    codePOST /api/{account_code}/pieces - Create piece
    Efforts
    codeGET /api/{account_code}/pieces/{id}/efforts - List efforts
    codePOST /api/{account_code}/pieces/{id}/efforts - Log effort
    Users
    codeGET /api/{account_code}/users/{id} - Get user
    codeGET /api/{account_code}/users/current - Current user

    Rate Limits

    Same limits as the MCP server — enforced per account and per token:

    Starter
    1,000/hour
    Professional
    10,000/hour
    Enterprise
    Custom

    Documentation

    Real calls you can paste in a terminal right now. Replace $MCPTASK_TOKEN with a token from View user → Advanced info → API Token and $ACCOUNT with your account code.

    codeCheck API version (no token needed)
    curl https://mcptask.online/api
    Response
    { "message": "mcptask.online REST API v0.10", "version": "0.10", "version_app": "5.72", "revision": "1272" }
    codeIdentify the current user
    curl https://mcptask.online/api/$ACCOUNT/users/current \
      -H "Authorization: Bearer $MCPTASK_TOKEN"
    Response
    { "id": 7, "user_nick": "george", "email": "george@example.com", "default_account_code": "bcp" }
    codeList your projects
    curl https://mcptask.online/api/$ACCOUNT/projects \
      -H "Authorization: Bearer $MCPTASK_TOKEN"
    Response
    [ { "id": 1, "code": "bcp", "name": "BCP Development" } ]
    codeCreate a piece (Task)
    curl -X POST https://mcptask.online/api/$ACCOUNT/pieces \
      -H "Authorization: Bearer $MCPTASK_TOKEN" \
      -H "Content-Type: application/json" \
      -d ''{"piece_type":"Task","name":"Review PR","project_id":1}''
    Response
    { "id": 42, "name": "Review PR", "piece_type": "Task", "state": "new" }
  • menu_bookQuick glossary

    Quick glossary

    A few terms used across this page, in plain English.

    MCP

    Model Context Protocol — a standard way AI assistants (Claude, Cursor, Cline, …) talk to external tools. mcptask.online speaks MCP natively, so any MCP client can drive it.

    SSE

    Server-Sent Events — the HTTP transport MCP uses for streaming tool calls. Your AI client opens a long-lived connection to our /mcp/sse URL.

    Webhook

    An HTTP call one app makes to another when something happens. Inbound = something calls mcptask.online (e.g. GitHub on push). Outbound = mcptask.online calls your system (planned, not live yet).

    MCPTASK_TOKEN

    A long random string that proves to mcptask.online that a request really comes from you. Generate it once in mcptask.online → View user → Advanced info → API Token and use it as a Bearer token. Treat it like a password.

    Custom connector

    The claude.ai / Cowork UI for adding a remote MCP server by URL. You give it the URL, click Connect, and the OAuth flow finishes the wiring — no token to copy, no config file to edit.

  • constructionAvailable MCP tools

    Available MCP Tools

    The 14 tools below are the real ones shipped by mcptask.online's MCP server today. AddMessageTool, AddAttachmentTool, CreatePieceTool, LogWorkProgressTool and the read-side tools work end-to-end.

    ToolDescription
    create_pieceCreate a new piece (task, story, epic, recurent)
    get_pieceFetch a single piece by ID
    list_piecesList pieces with filters (project, status, type)
    get_next_taskGet the highest-priority available task
    get_project_treeGet the project hierarchy (epics/stories/tasks)
    list_projectsList projects you have access to
    get_projectFetch one project's metadata
    get_current_userIdentify the user behind the current token
    log_work_progressLog effort on a piece and update its progress
    add_messageAdd a comment / message to a piece
    add_attachmentAttach a file to a piece
    get_attachmentFetch attachment metadata and a direct download URL for a piece
    get_piece_effortsRead time-tracking entries for a piece
    get_usage_guideSelf-describe the server (capabilities and usage hints)
  • vpn_keyAuthentication

    Authentication

    Two ways in, depending on your client. Claude Code / Cursor / Cline use a long-lived MCPTASK_TOKEN (Bearer). Claude Cowork / claude.ai use OAuth 2.0 with dynamic client registration — you never touch a token.

    MCPTASK_TOKEN (Bearer — for Claude Code, Cursor, Cline):

    • vpn_keyView user → API token in mcptask.online
    • vpn_keyTied to your user account, scoped to your workspaces
    • vpn_keyOnce and forever — no annoying periodic rotations
    • vpn_keyTreat it like a password — anyone holding it acts as you

    OAuth 2.0 (for Claude Cowork / claude.ai):

    • lockNo client secret, no manual credential — dynamic client registration
    • lockPKCE S256 — secure even on public clients
    • lockApproval is per-workspace — you pick which mcptask.online workspace the connector can act on
    • lockRevoke from claude.ai at any time (Customize → Connectors → Remove)

    Permissions:

    • securityToken inherits your user permissions — no extra scopes today
    • securityRead-only vs. read-write is controlled by the actions you call
    • securityPer-project isolation is enforced server-side
    • securityAll calls are logged under your user
  • speedRate limits

    Rate Limits

    PlanRequests/Hour
    Starter1,000 requests/hour
    Professional10,000 requests/hour
    EnterpriseCustom

    Limits are enforced per account and per token: 60 requests/minute per token, plus the hourly per-account cap shown below. Contact us if you need a higher ceiling.

Planned Integrations (Roadmap)

Things we are considering. If one matters to you, mail us — high-demand items get prioritized.

webhook

Outgoing Webhooks

hourglass_empty
Coming soon
thumb_up
mcptask.online → your system event push. Vote if you need it.
add

Missing an integration?

Request it

Request an integration: email us with your use case. We pick the next batch of integrations from real demand, not votes.